
| HOME | ||||||||||||||||||||||||||||||||||||||||
| GALLERIES | ||||||||||||||||||||||||||||||||||||||||
| IMPRINT | ||||||||||||||||||||||||||||||||||||||||
|
||||||||||||||||||||||||||||||||||||||||
| COMMUNITY | ||||||||||||||||||||||||||||||||||||||||
| CONTACT | ||||||||||||||||||||||||||||||||||||||||
| STORE | ||||||||||||||||||||||||||||||||||||||||
| ABOUT ME | ||||||||||||||||||||||||||||||||||||||||

PREVIOUS |
|

NEXT |
|
|
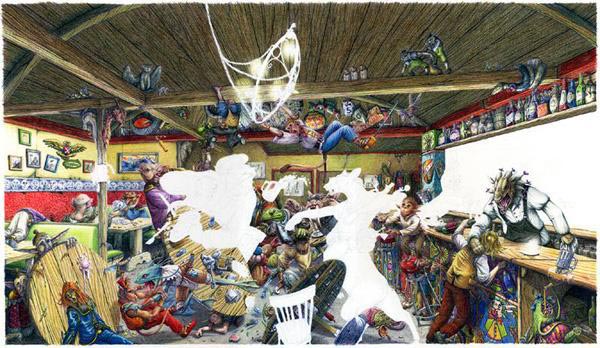
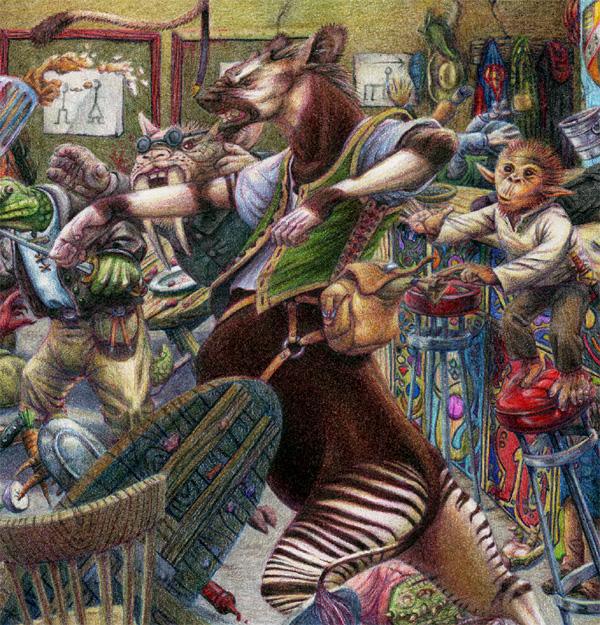
THE ENDBarroom Brawl update: Only about five weeks since the last update, and yet here we are. The barroom brawl piece has been finished and is in the middle of all the messy "stuff" that comes afterward. Read on to find out what that includes. In getting to that finished point, the mirror was installed, the chandelier hung and some candles lit, the chairs and other minor objects were thrown and the two main characters joined the fray.
Wax Bloom: Now that the entire piece is finished, I'll need to worry about "wax bloom". The binding agent for colored pencils is wax. As a result, a thick layer of colored pencil will "bloom" its wax content; this means that the wax rises to the surface and forms a milky deposit that dulls and whitens the piece. A warm environment increases the amount of bloom, but the wax will bloom even in a cool environment. There are two methods for dealing with wax bloom. The first method, and the one I prefer, is to take care of the bloom after it happens. Wait a week after creating the piece and then rub a cotton ball or cotton swab over the surface. This will lift up the excess wax and return the surface to a lustrous shine. The surface is not overly delicate, so you shouldn't be too careful when rubbing. Don't be too aggressive, either, because smearing is possible. By experimenting, you'll learn fairly quickly how much pressure is most effective. After this first rubbing, there is still wax trapped in the piece waiting for its turn to surface. Wait another week and, if more wax has bloomed, rub the surface again. After this second removal, the surface should stay nice and glossy. The second method is to prevent the wax bloom before it happens. Immediately after finishing the piece, spray the surface with a fixative (such as artist's Workable Fixative). This will seal the surface as-is and prevent wax from raising to the top. I don't use this method as much, not because it isn't as effectve, but simply because I'm more used to the previous method. I have read that some fixatives can cause certain pigments to discolor, another reason I avoid this method. There are times when you can't wait two weeks before sending the piece on, however. In these cases, spray away! But remember, if you finish the piece a few days after laying a heavy layer of colored pencil on part of the artwork, sections may already have developed wax bloom. Simply rub those areas (or the entire surface) to remove the bloom and then spray the surface with fixative. Archiving and website preparation: Of course, after the piece is finished you'll want to show it off! I don't mean just the original- no, you may want to make prints or put the piece up on a website. This means archiving the artwork. You may want to photograph the piece so that you can make slides and prints. This isn't a bad idea for serious artists, but it can be expensive and time consuming. It is also too complicated for me to go into in this newsletter.
Even if you photograph the piece, you'll have to scan it if you want it on your website. For a piece larger than 8"x14" this means either scanning a high-quality print made from the photography session or scanning the artwork in pieces and stitching those pieces back together. In the case of the barroom brawl, I did the second (I haven't photographed the piece yet). Stitching the pieces together is a careful process of matching the edges and tweaking the color and contrast of the different pieces.
When I scan a piece, I keep several different files for future use. After I have all of these files, I burn them to a CD or two so that I have an archived backup. A computer failure will not cause all of my images to disappear. Naming Your Baby: Naturally, before you can post the piece or save it, you have to give it a title. This seemingly simple step, naming your artwork, often turns out to be one of the toughest parts of the entire process. For example, it was not until I had finished the barroom brawl and walked away for over 24 hours that its title came to me. Years have gone by since the concept was developed. Since work began on the piece. Since I brainstormed possible titles with my wife. It was not until last night, sitting in a friend's house discussing life, the universe and everything, that a comfortable name popped into my head.
|
|

RETURN TO THE TOP
|
PREVIOUS |
|
NEXT |
Join the David Deen Mailing List
The contents of this document are copyrighted
2002-2005 by David Deen.
Send webpage suggestions or comments to
email@daviddeen.com.
This document last updated Mon Oct 2 11:00:31 2006.
This document last updated Mon Oct 2 11:00:31 2006.